1. Introduction - 1.1 About this user guide
This user guide was last updated in December 2025
This is the User Guide for Causeway 2.7. It is intended for Authors using Causeway to create bespoke learning packages and supersedes previous guides
You can access topics of interest using the navigation panel on the left.
Each topic area may contain all or some of the following:
- Written guidelines on how to use the particular feature
- A video guide demonstrating the feature and how to use it
- Worked examples
- An outline of any Tips, Tricks and Traps to be aware of
- A summary document which can be downloaded or viewed inline.
In addition from time to time we will add articles about the online learning creation process.
Please note that this User Guide is a dynamic document which will be incrementally updated with extra articles and information as it becomes available.
Supported Browsers and LMS environments
Learning Management Systems Cancel Impersonation
Causeway is compatible with all the standard SCORM compliant systems.
This release has been tested in the following environments
- Moodle 4.1.6
- Canvas
- Learndash
- Elentra
Browser Supported - note: older versions of your browser may also work but some features may not be supported.
Major Browsers
- Google Chrome: Version 142
- Mozilla Firefox: Version 144
- Apple Safari: Version 26.1 (Apple OS only)
- Microsoft Edge: Version 143
- Opera: Version 125
1. Introduction - 1.2 Release notes
The Causeway Digital Authoring Platform version 2.7 released in December 2025 includes a major new upgrade:
The new feature allows authors to collect analytics on how their learning packages are used. When students access a package (via URL or LMS such as Moodle or Canvas), the author can view usage data through the Causeway package manager. The analytics include date of access, student score, and time to complete. Authors can also request student identification (name, email, and ID) by adding an ID element. Data is tracked by IP address, and only the student’s most recent attempt is shown.
Additionally, a final page is now automatically added to each package, showing students their score, completion time, and any requested action buttons (e.g., submit data, print certificate, answers, or content).
The Causeway Digital Authoring Platform version 2.7, released in December 2025, includes several updates:
Analytics: This release adds a new telemetry feature that tracks student usage statistics. Data is collected anonymously unless the author chooses to include the User Details element, which captures a student’s name and email. Usage analytics are accessible via a new Analytics button
 both in the Package Manager and on the Package Edit Page. The Package Manager displays summary statistics, and selecting a package shows detailed usage information for each user—the same detailed view shown when accessed from the edit screen.
- Automatic data collection: If your Causeway packages are distributed via URLs, usage statistics will be collected automatically on an ongoing basis.
- Moodle environment users: If you are using a Moodle environment, the zip file of your package will need to be reloaded into your Moodle environment to activate telemetry.
Telemetry will help you track engagement and performance by students using your eLearning for the upcoming academic year.
Information displayed includes fields for:
Total Openings -This shows the total number of times the package has been opened, counting all attempts by an individual.
Total Completions - How many times the package has been completed, showing only data from the most recent attempt.
Average Time to Completion - This shows the average time taken by users to complete this package.
Average Score - This shows the average score for users completing the package.
Analytics data is collected for each package and can be viewed from its edit screen. At the package manager level, you can select the analytics option to view your packages and access the specific analytics data you want to examine.
- Automatic data collection: If your Causeway packages are distributed via URLs, usage statistics will be collected automatically on an ongoing basis.
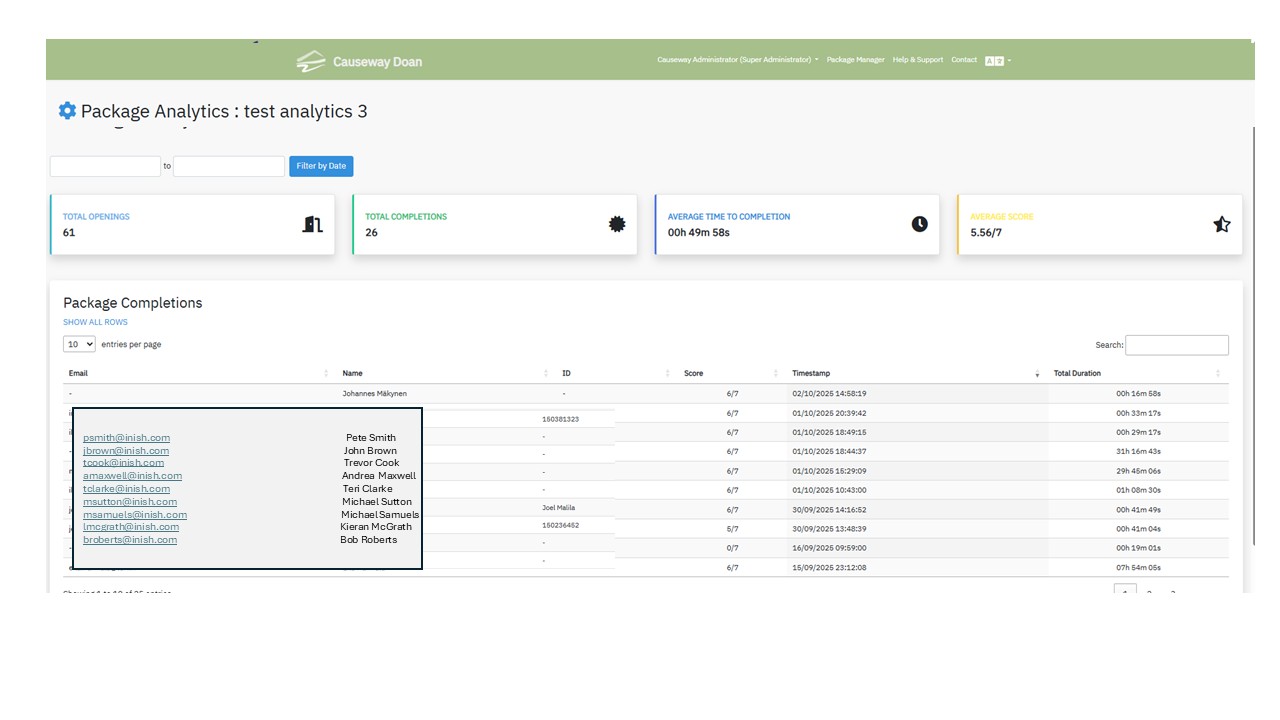
The table displays the data for each completed attempt for each user. Their email address, name and ID is displayed if the author has included the User Details element within the package. In addition the table shows the users score, timestamp when the attempt was made and the time taken to complete the package.
Date Range
You can change the date range of the displayed data by clicking one of the shown dates and selecting the specific range you want to view. 
The following is displayed.

After selecting your dates, click Apply to display the filtered data. If there are multiple rows, you can view them in groups of 10 or choose Show All to see everything. To download the data, click Download Excel, which will save a CSV file that can be opened in any spreadsheet application.
2. Completion Page – Now automatically added to the end of every package, providing students with:
- A summary of their usage
- Their score and time taken
- Prominent submission buttons (if required by the author)
- Easy access to any PDFs that need to be printed
Authors can disable the telemetry page via a flag in General Settings. Student names are shown only if the User Details element is included. This element should appear near the start of the package and may only be used once. A new option allows authors to require students to complete the User Details fields; if a student attempts to proceed without doing so, a warning is displayed.
An Example of a Completion Page

3. Save Button: A new safeguard alerts authors when they attempt to leave a page after editing an element without saving. If unsaved changes are detected, the system displays a warning message.

2. Getting started - 2.1 Logging in
Video overview of the simple logging in process:
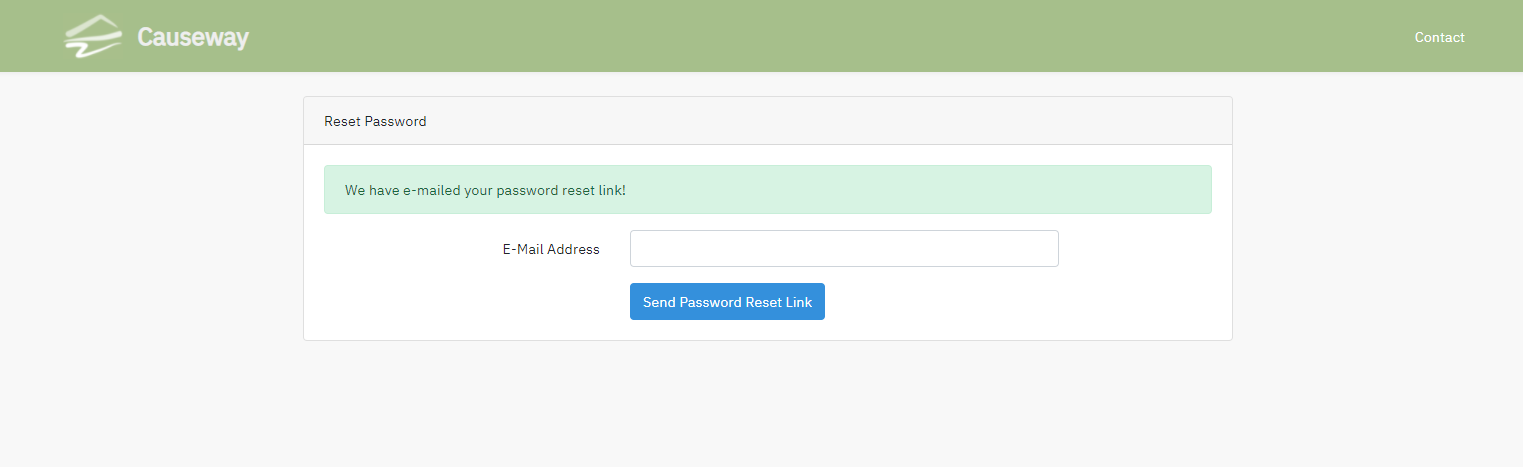
When you click on the "forgot password" button you will be asked to enter your email

You should then receive a message like this to reset your password
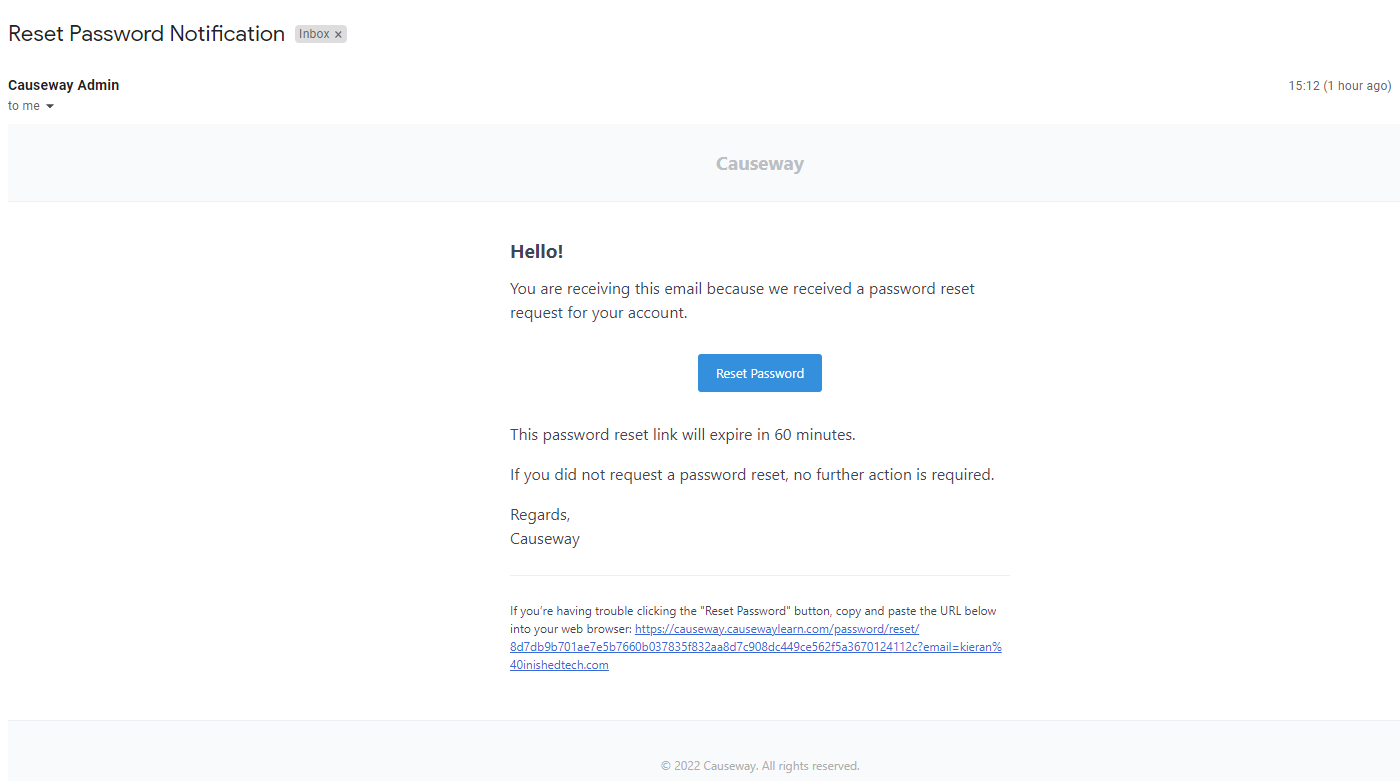
When you click on the "forgot password" button you will be asked to enter your email
2. Getting started - 2.2 Preparing to develop a learning package
There are a few things worth bearing in mind before you start to develop a learning package. Apart from the topic itself you will need to think about your learners / audience and the learning objectives.
Assembling your resources
You can of course open Causeway and start writing your content directly into Causeway, but an initial plan will make the process easier. You might want to have some or all of the following resources to hand:
- The text you are going to use
- Questions and assessments
- Media such as still images, videos, animations or audio files
Points to remember
To create engaging e-learning content, use language that feels personal, relevant, and conversational. Keep writing approachable by using contractions and addressing learners directly. Connect on an emotional level with personalized feedback, like replacing “That is not correct” with “Sorry, that’s not quite right. Here’s a better way to solve the problem.” Make learning objectives personal (e.g., “Completing this course will help you…”), and keep instructions concise for better readability, such as using “Hover over the text field. Click to enter text,” instead of longer, complex instructions.
To engage learners effectively, incorporate interactivity that encourages discovery, exploration, and connection with content. Interactive learning, like tapping the screen, moving objects, or making choices, promotes "learning by doing," making content more memorable and applicable. Complex interactions aren’t essential; even simple ones can help learners practice decision-making and problem-solving in a safe environment. Prioritize relevance by focusing on learners’ needs, challenges, and learning goals, and offer constructive feedback to help them learn from mistakes in a consequence-free setting.
Build Components that can be Reused
A Reusable Learning Object (RLO) is a modular, digital resource designed for use across various educational contexts. Key characteristics of RLOs include:
- Modularity: Self-contained units that can stand alone or combine with others for a comprehensive experience.
- Reusability: Adaptable across different subjects and levels with minimal changes.
- Metadata: Includes searchable information like subject, grade level, and keywords.
Components include:
- Content: Core materials like text, images, and quizzes.
- Learning Objectives: Clear goals for learner outcomes.
- Assessment: Tools for evaluating understanding.
- Instructional Strategies: Suggestions for effective use.
- Context Information: Background for curriculum placement.
Benefits:
- Efficiency: Saves time by reusing resources.
- Consistency: Uniform content delivery.
- Collaboration: Supports sharing among educators.
- Customization: Easily adaptable to specific needs.
RLOs are widely used in e-learning for their flexibility and quality enhancement.
Observation/Note

A visually appealing course design enhances learner engagement, encouraging exploration. Start by grouping similar elements together—a principle known as proximity—to create a sense of order. Also, apply subtraction by reducing clutter; even well-grouped elements can overwhelm if there are too many. Use images or video clips where possible, as visuals are often more engaging than text alone.
Conclusion
Remember, visual design for e-learning is more than just aesthetics. The visuals you use are powerful messengers, setting the tone and communicating key ideas about your course without requiring you to say a word.
2. Getting started - 2.3 Administrator Role Document
Getting started as an Administrator document can be viewed online or downloaded as a PDF
2. Getting started - 2.4 Author Role Document
Getting started as an Author document can be viewed online or downloaded as a PDF
3. Package Manager - 3.1 An overview of package manager
There is a quick tour of the package manager in the video below:
The Opening Banner Menu has a number of buttons.

Note: The opening banner can be customized to your site by using your institution's name and logo.
The following buttons are available
User Name:- This displays your name, the down arrow to the right gives access to the logout button.

Clicking on this exits the system.
Having logged in, the system opens on the Package Manager screen, initially this screen will have no packages.

By running the cursor over the fields displayed you can see the active buttons on the screen, in addition to the user name the following fields are active.
- Package Manager - Lists the packages in your folder.
- Help and Support - Access to online support
- Contact. - Submit an inquiry to the Causeway Support team
 - Dropdown list switching the Causeway environment to another language.
Contact the Causeway team to add an alternate language if required.
3. Package Manager - 3.2 Banner
Package Manager Banner

Search - When there are multiple packages in your folder this facility enables the Author to search for a particular package. This is based on the package name or on the tags set in the package settings.
Analytics - The Analytics button displays summary statistics on package usage, and selecting a package shows detailed information for each user—the same detailed view is shown when accessed from the edit screen.
[Import a Package] - This facility enables the importation of Causeway packages that have previously been exported in SCORM format.
[New Feature] It is now possible to import a PowerPoint file into Causeway. Use the browse facility to navigate to your .pptx file and press [Save]. The Powerpoint file is loaded into Causeway, each slide is added as an image element. If the Powerpoint slide pack has an audio track then this is automatically added. Having imported the slides it is possible to incorporate other elements such as MCQs, Word Match etc in the newly created Causeway package.
[Create a Package] - This enables an Author to start building a package from scratch
3. Package Manager - 3.3 Package display in Package Manager
Package Manager

Each package is identified and the following fields are displayed
Status: Button 
Package Name: Polyarthritis v2
Package Information 
Blue Circle  the number of chapters in the package
Green Circle  the number of pages in the package
Yellow Circle  the number of elements in the package
Action icon:  this gives access to the tools available to manipulate the package. When this is clicked the following menu appears.

Show - If the package has been published then this option launches the package in a new browser window.
Edit - Opens the package in edit mode.
Delete - Deletes the package. (Should be used with care)
Export - Exports the package in a zip file in SCORM 1.2, SCORM 2004 or HTML format.
Preview - Displays the package in preview mode.
Copy - Creates a copy of the package in the Author's package catalogue.
Analytics - Displays the usage data for the package
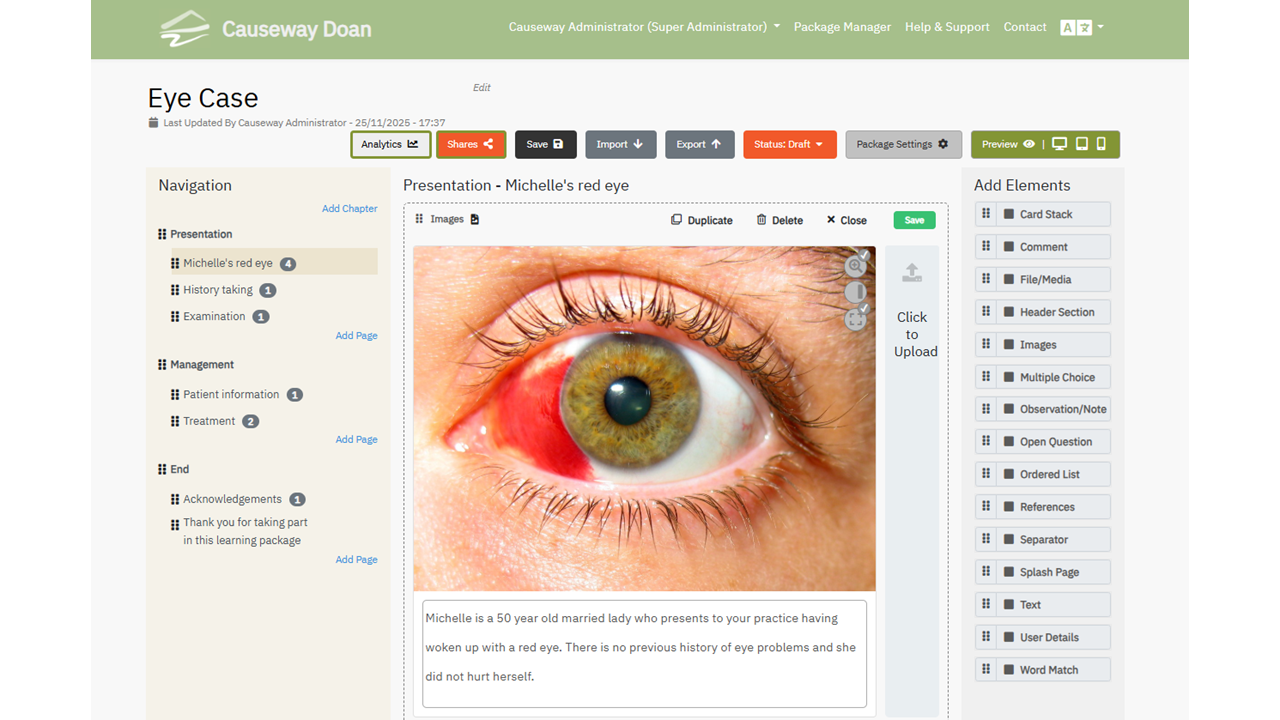
4. Creating a Causeway Package - 4.1 Edit Screen
Edit Screen Layout showing the Package Title& Menu Options at the top
followed underneath by the Navigation, Edit & Element Panels
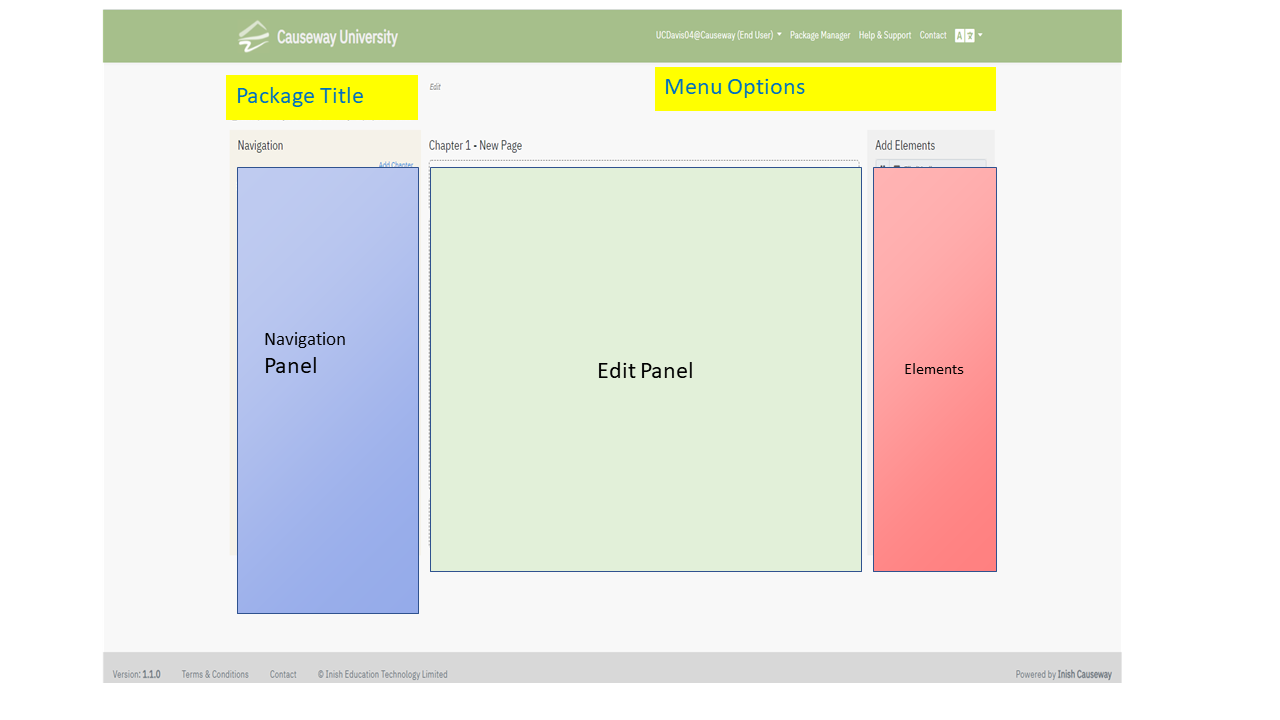
When a package is created from scratch the following screen appears: showing the input fields for the Package Name and 1st Chapter Name. Note: these can edited at any time.

The Create Package button completes the initial set up and you will be presented with the edit package screen.
The package is built up by dragging elements on to the the edit panel.
Add Chapters and Pages to develop your eLearning package, this builds up the navigation panel.
The procedure to manipulate these components is covered later.
Example of an Edit Screen with content added
Import an eLearning Component
You can now import previously developed content into a package you are editing.
To do this, place your cursor where you want to insert the content and click the import button  .
.
A list of existing packages in your account will appear, and you can also choose from content shared with you.

You can insert an entire package using the Import Package button  or expand it using the plus
  button to select specific chapters or pages. Click on the import button on the right to import the selected content. To preview content before selecting click on the item name and a preview of the selected content is displayed.
Once imported, the content can be edited and rearranged like any other part of the package.
Finally, save your package.
This feature allows you to easily reuse and modify existing content.
Telemetry & Analytics
Data is collected anonymously or if the author wishes, a student’s name and email address can be collected by including the User Details element. Causeway collects student usage statistics, which are presented through a new Analytics button
 .
.- Automatic data collection: If your Causeway packages are distributed via URLs, usage statistics will be collected automatically on an ongoing basis.
- Moodle environment users: If you are using a Moodle environment, the zip file of your package will need to be reloaded into your Moodle environment to activate telemetry.
Telemetry will help you track engagement and performance by students using your eLearning for the upcoming academic year.
Information displayed includes fields for:
Total Openings -This shows the total number of times the package has been opened, counting all attempts by an individual.
Total Completions - How many times the package has been completed, showing only data from the most recent attempt.
Average Time to Completion - This shows the average time taken by users to complete this package.
Average Score - This shows the average score for users completing the package.
- Automatic data collection: If your Causeway packages are distributed via URLs, usage statistics will be collected automatically on an ongoing basis.
The table displays the data for each completed attempt for each user. Their email address, name and ID is displayed if the author has included the User Details element within the package. In addition the table shows the users score, timestamp when the attempt was made and the time taken to complete the package.
Date Range
You can change the date range of the displayed data by clicking one of the shown dates and selecting the specific range you want to view.
The following is displayed.
After selecting your dates, click Apply to display the filtered data. If there are multiple rows, you can view them in groups of 10 or choose Show All to see everything. To download the data, click Download Excel, which will save a CSV file that can be opened in any spreadsheet application.
Note: A Completion Page – Now automatically added to the end of every package, providing students with:
- A summary of their usage
- Their score and time taken
- Prominent submission buttons (if required by the author)
- Easy access to any PDFs that need to be printed
If this is not desired by the author then there is a flag in General settings that suppresses this page
An Example of a Completion Page:

4. Creating a Causeway Package - 4.2 Audio Track
It is now possible to record an audio description for any of the Causeway elements. The following microphone icon  is located in the bottom right hand corner. When this is clicked the following appears on the screen.

When you press Record; the recording toolbar  will record your input until you press the black button to stop the recording. When this happens the following appears
  , the green triangle will play back whatever you have recorded. If you are unhappy with the content the X will delete the audio track and you can re-record if you wish.
Recording Audio Instruction Video
When a learner encounters an element with an added audio tracked the  speaker icon appears in the top right hand corner of the element. When the students clicks on this icon. the following play audio panel appears
 and the audio track is played when the triangle shaped button is clicked.
An author can test these features with the preview options before the package is published or exported.
4. Creating a Causeway Package - 4.3 Edit Captions
When a caption is available within an element, then it can be edited to improve the layout and display
i.e.
by clicking on the  icon the following menu is displayed.

These options allow the use of Bold, Italics, Underscore, Font size, URL, Font Colour, Text position and Special Characters within the caption
i.e.
5. Author Elements - 5.1 Elements Explained
The Author adds elements to their learning package by double clicking on the element they want to insert. This adds the element to the bottom of the page they are currently on. Elements can be re-ordered on a page by dragging them to the position required using the  6 dot icon. Do not forget to save your work when you have completed the task.. The element types ( Card Stack, Comment, File/Media, Header Section, Images, Multiple Choice, Observation/Note, Open Question, Ordered List, References, Separator, Text, User Details & Word Match) available are listed below.

Moving Elements to a Different Page
An element can be moved to another page by dragging it from the edit panel to a page listed on the navigation panel. Press [Save] . The moved element will have been positioned at the bottom of this new page. Click on the selected page and position the element as required.
Duplicating Elements
When you have saved your edits you can create a duplicate by clicking the  duplicate icon. The copied element is added at the bottom of the page. This can be renamed , moved, edited as required.
Remember to press [Save]
When you are editing an element after you have saved your changes you can click on
x Close to close the element.
5. Author Elements - 5.2 Card Stack
Card Stack - This element enables an author to create a set of flash cards for the Learner.
The first step is to insert the Title of the Flash card set.
Each card has a front and a back. The front of the can have an image or a statement. When the Learner clicks on the card. The reverse side is displayed giving the correct answer. The Learning clicks on the Correct or Wrong buttons and the card is added to that stack. The next card is displayed and the process is followed until all of the Flash card are shown. The learner can review the cards they had correctly or wrongly answered.
The Author can use the snip tool to cut and paste an image or type in text unto a card. A new card is added by clicking on the plus icon  . Cards can be deleted and the stack is saved when the save button
  is pressed.

Flash Card Learner View.
Card Front

Card Back

Card Stack Explanation Video
5. Author Elements - 5.3 Comment
The Comment element can be added when the Author wants to add additional information to the Package. The text block is tagged with Comment label in the published package.

5. Author Elements - 5.4 File/Media
Upload Files

- Use File/Media to upload files (e.g.. Word, PDF, PowerPoint etc. ) into Causeway which students can then either download onto their own computers or view inline as PDFs within Causeway.
- This element also enables an Author to upload video or audio files. Most of the standard formats are supported.
VIDEO PLAYER FORMATS (File/Media Element)
video/mp4 (generally .mp4 file extension)
video/x-m4v (generally .m4v file extension)
video/webm (generally .webm file extension)
video/ogg (generally .ogg file extension)
If the user uploads a file with one of the following video mime-types:
video/x-ms-asf (generally .asf or .wmv file extension)
video/x-flv (generally .flv file extension)
video/quicktime (generally .mov file extension)
video/x-msvideo (generally .avi file extension)
then the file will be automatically transcoded by causeway into .mp4 format for native playback
AUDIO PLAYER FORMATS (File/Media Element)
The HTML5 Audio player will play the following mime types:
audio/mpeg (generally .mp3 file extension)
audio/wav & audio/x-wav (generally .wav file extension)
audio/ogg (generally .ogg file extension)
OTHER FILE FORMATS (File/Media Element)
If one of the following file extensions is uploaded, then the user
will be offered the option to produce a viewable PDF version of that file
Word formats: doc , docx , txt
PowerPoint: pptx , pps , ppt
Excel: xls , xlt , xlsx ,csv
Other formats e.g. open office etc. can also be loaded
Note:
When a file is being loaded a progress bar is displayed.

When a non media file is uploaded the author can decide whether they want the learner to see the contents of the file online as well as download the original file format.

Uploading Files instruction video
5. Author Elements - 5.5 Header Section

The Header Section element enables the input of text content and several tools are available to enable the formatting of the Header
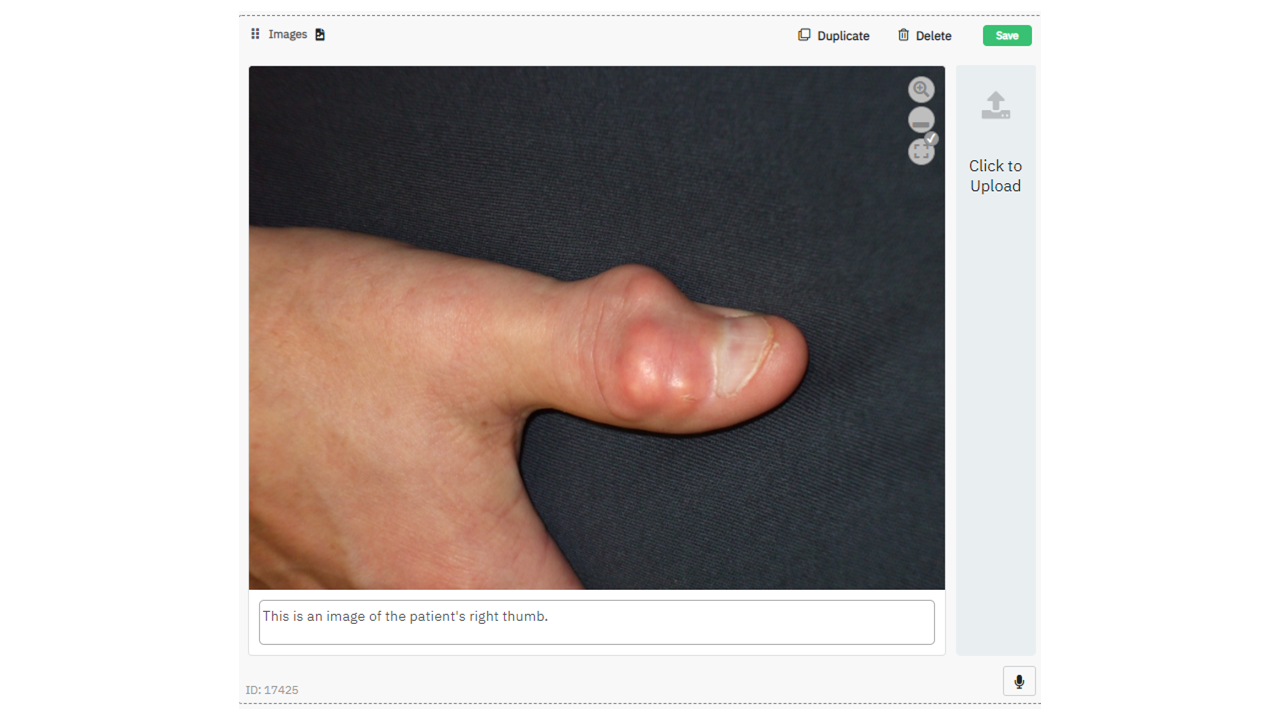
5. Author Elements - 5.6 Images
This element is used to import an image to the package using the PC’s file manager. This image is scaled to fit the page on the learner’s device. It is possible to add up to four images which can be displayed in a line.
A caption can be added to the image.
The author can also set a flag that enables the learner to use a magnifier to view the image in close detail.
Step 1 upload image from your computer:

Image Element after an image is uploaded.
The image tool bar is displayed on the desired image 
 Magnifier icon switches on the magnifier functionality for the learner.
 Position icon toggles the position of the caption (below,left, above,right)
 Optimize icon optimizes the uploaded image to display in the learner's browser. This can be switched off if the author wants the image displayed in it's native resolution.
Captions
A caption can be added for each image, this can be placed above or below the image. It is also possible to display the caption to the left or right of the image. (care should be taken if this is used with multiple images). Captions can be quite substantial and a small menu to format the content is available. This is accessed via the menu icon  .
.

Moving captions around an image
5. Author Elements - 5.7 Multiple Choice

The Multiple-Choice element is very flexible and enables data to be collected about a Learner’s performance. It allows the Author to provide feedback when a correct or incorrect answer is given.
There is a flag which can be set to invite the learner to retry if they get an incorrect answer and it is possible to have more than one correct answer. If the collect learner data flag is set in Package Settings, then the Learner responses can be stored and downloaded for later analysis. If the Package is uploaded to a Learner Management system such as Canvas or Moodle, then the Learner’s performance is automatically added to the LMS’s Grade Book
5. Author Elements - 5.8 Observation /Note

The Observation / Note element can be added when the Author wants to add additional information to the Package. The text block is tagged with Observation / Note label in the published package.
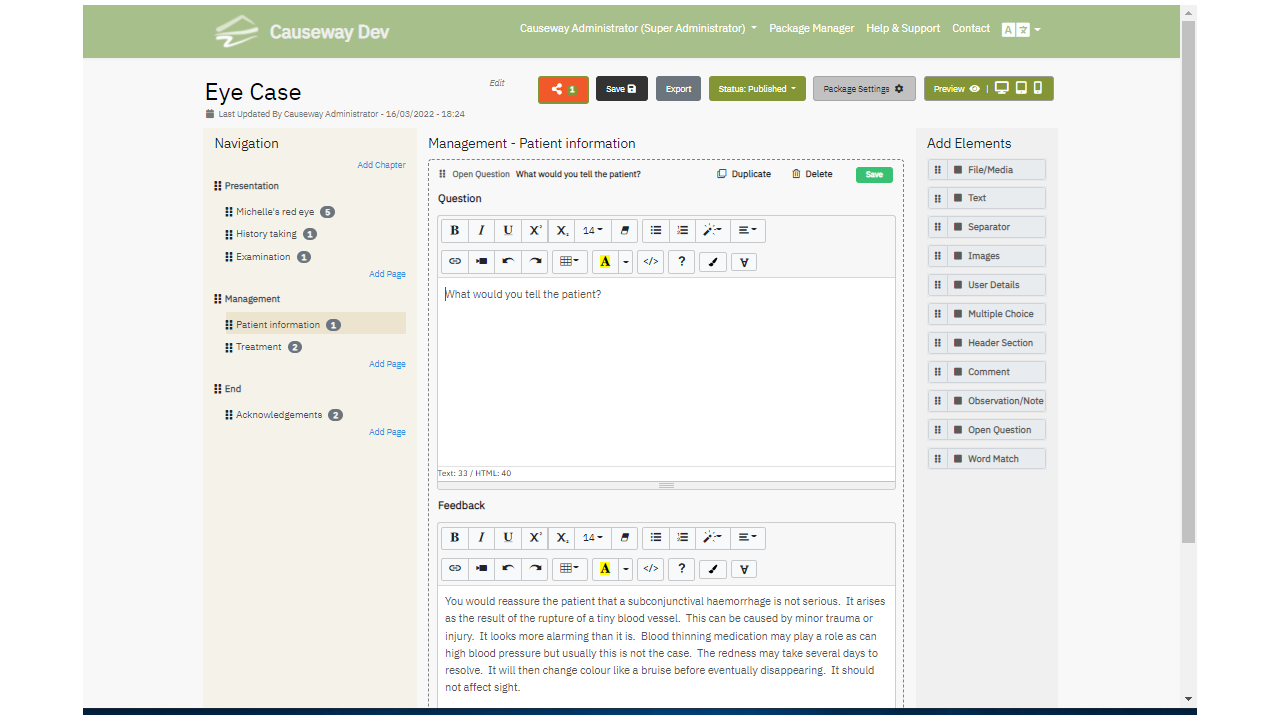
5. Author Elements - 5.9 Open Question

The Open Question element enables the Author to pose a question and the package will invite the Learner to type a full response. If desired the Author can provide expanded feedback in the box provided. If the collect learner data flag is set in Package Settings then the Learner response can be stored and downloaded for later analysis.
When a learner is responding to an open question. They type their response into the box and click the Done button  to submit their answer.
5. Author Elements - 5.10 Ordered List
The Author can use this element to create and display an ordered list. When this is accessed by the Learner this list order is scrambled and the Learner is asked to reorder the list into the correct order. The list is given a meaningful title. A new line can be added by clicking on the green plus button  .
.
Lines are deleted using the red delete button 
Learners rearrange the displayed list using the  grab icon.
Author View

Learner View

5. Author Elements - 5.11 References
This element enables the author to build a simple ordered list of references. This can include URLs to external reference documents

The text in this field can edit by clicking on the menu icon  to give access to a set edit features. Additional lines can be added by clicking the plus icon
  .
.
5. Author Elements - 5.12 Separator
This element places a separator bar in the body of the eLearning Package the author can specify the width of the line and the colour. If the Hide Following Elements box is ticked, then when a learner is using the package, they have to click the 'hide the following' content box to view remaining content on that page.

Separator bar and References element
5. Author Elements - 5.13 Splash Page
Add a Splash Page
A new element, the [Splash Page], allows authors to add an introductory page to their learning package. You can choose from 4 standard images, upload your own image, or use a block background colour. The page includes two text blocks: a title and a footer. The text in the header and footer and be aligned using the position icons and the text colour can be changed.
The spacing of multiple lines of text within header and footer can be adjusted using the sliders  provided.
Example:

Note: The Splash Page element is a special case and cannot be mixed with other elements on the same page.
5. Author Elements - 5.14 Text

The text element enables the input of text content and several tools are available to format this and in addition there are insert tools which enable the inclusion of URLs to external web sites and external video clips such as those hosted in Youtube or Vimeo.
Note: The text editor is a simple tool that enables that creation of content that is rendered consistently clearly in a variety of browsers (Chrome, Firefox, Edge, Safari etc). Text can be cut and pasted into this field from other sources, such as MS Word, but this may not be rendered correctly. It is possible to paste plain text only, this can then be styled using the editor tools. This gives a more consistent look and feel to your learning package.
Text Editor Tool Bar

Font Style Bold: toggle font weight icon Italic: toggle italic icon Underline: toggle underline icon Superscript: toggle superscript icon Subscript: toggle subscript icon Font Size: select font size icon Remove Font Style: clear font style icon Select the font from the drop down list menu bar | Paragraph style Unordered List: toggle unordered list icon Ordered List: toggle ordered list icon Style: format selected block icon Paragraph: select paragraph justification icon |
Insert Image: insert an image from your file store using the image icon link: open link dialogue icon Video: open video link dialogue icon Table: insert a table icon Recent colour: current foreground and background colour icon More Colour: set foreground and background colour icon Pop Up: insert a pop up text block associated with selected text icon | Misc Code view: toggle wysiwyg and html editing mode icon Undo: undo last action icon Redo: redo last action icon Special characters: insert special characters icon Fix web based image icon |


 it is also possible to cut and paste an image into the text field. This image can be position and rescaled within the test block.


Note: Inserting images into a text box should be treated with care. If very large images are inserted into the text editor can be overloaded. It is fine for small scale images. It is recommended that the Image element should be used for high definition and large images. If an image is copied from a web page then a dynamic URL can be added which looks like an image on the screen. This could pose a problem if the package is loaded into your learning management system. The fix image button  in the menu will download the remote image into your package and resolve this issue.
Font library and inserting images into text blocks
Using Popups
If an author wants to use the popup facility  they should highlight the text they want to utilize and click on the icon the following window pops up and additional information can be input. The author can determine the text position, whether it can be closed automatically or on pressing
  and additionally set the colour of the text box.
Author View

Pop Up Feature
5. Author Elements - 5.15 User Details

The User Details element allows authors to collect learner identification information and is typically placed at the start of a package. It works with the “collect learner data” setting and helps identify answer scripts, generate PDFs, and print names on completion certificates. If collected, the learner’s name also appears on the Analytics screen. The element can be used only once per package. A new “Is Mandatory” option lets authors require completion of these fields, triggering a warning if a student tries to continue without filling them in.
5. Author Elements - 5.16 Word Match

The Word Match element was introduced with Causeway 2.1. Basically this allows authors to design questions which require unprompted student input. For example you may wish the student to come up with a single word response, such as a diagnosis, by simply asking "what is the diagnosis" and leave a text box for students to type in their answers. You can also allow students to type in a list, or a short essay format answer, again without prompting, which the computer then "marks" Authors furnish ranges of acceptable answers. The video below shows how this is done:
6. Navigation Panel - 6.1 Overview
An example of a Navigation panel
This is the authors view of the panel

Note the numbers in the circles indicate the number of elements on a page.
A learner would see this as

6. Navigation Panel - 6.2 Package, Chapter & Page Names
Package Name
When a package is created the name is displayed in the Package Manager. To edit this name go to the Edit Package Screen.
in the top left corner the package name is displayed.

Click on the word Edit to the right of the title.

Edit the name and press [Save] to confirm the change
Chapter and Page Names
In the navigation column place your cursor on the Chapter / Page item you want to edit.
A set of icons are displayed.

Click on the  edit symbol, the chapter / Page text is highlighted this can now be edited.
The six dot icon allows the name to be moved within the navigation panel.
The delete button  removes the chapter/ page
Press [Save] to confirm your edit.
6. Navigation Panel - 6.3 Deleting Chapters / Pages
In the navigation column place your cursor on the Chapter / Page item you want to delete.
A set of icons are displayed.
Click on the delete symbol  the following panel appears

Press [Delete] to confirm
6. Navigation Panel - 6.4 Re-Ordering Navigation Panel
By dragging the six dot icon  to the left of the item you want move you can drag this to the desired position. This mechanism works for both Chapters and Pages.
Press [Save] to confirm the move.
Note: it also possible to drag an element from the edit panel to a different page on the navigation panel.
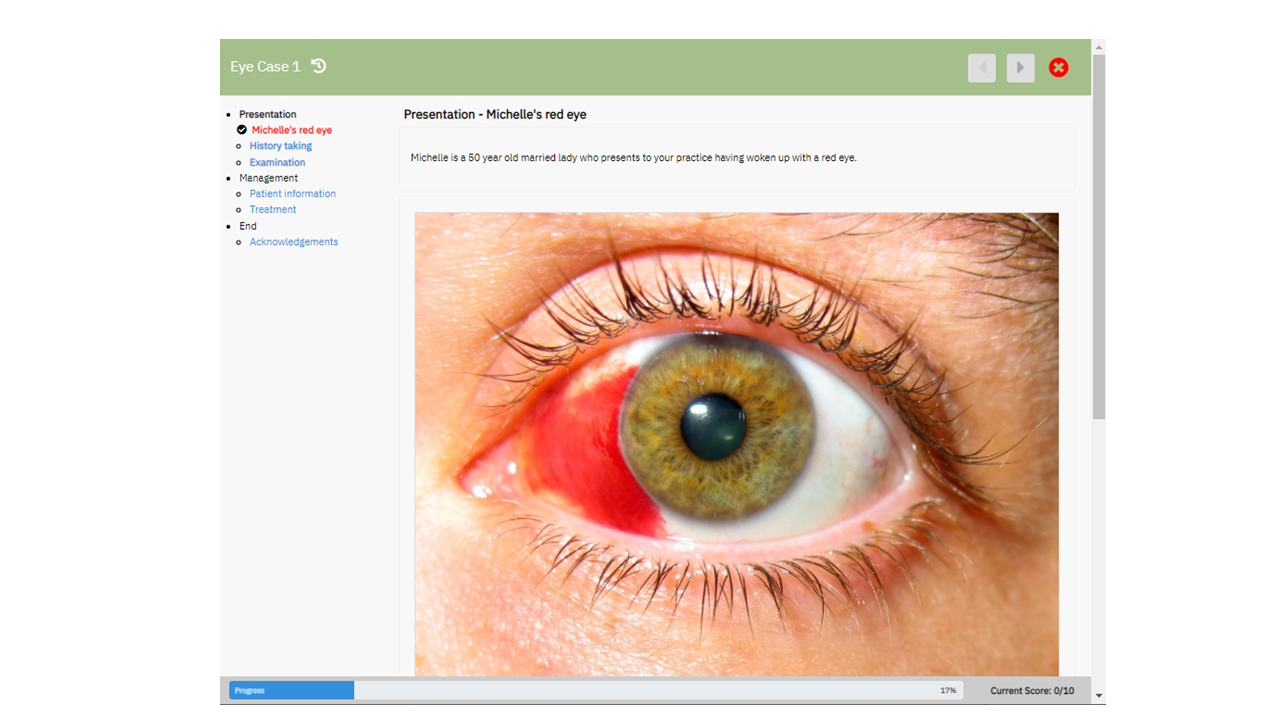
7. Using Preview - 7.1 Preview Function
When an Author is developing a package, at any stage, by selecting the preview menu option  on the package banner they can see what their package will look like to a learner.
The icons representing a PC  , a Tablet
  or a Smartphone
  are available. Once selected, a preview simulating what the package would look like if it were displayed on that device.
Select the exit icon  to return to the edit view.
An example of Preview
8. Package Status - 8.1 Publishing Packages
When a package is published its URL can be shared with colleagues or learners. Change the status of the package by clicking on the status menu button and selecting the appropriate option and Saving the package.
You can access the published package via several routes.
1.  Click on the link icon in the Published Status Box.
2. The package URL can also be found in the General section of [Package Settings] - Cut and Paste this for distribution.
3. Via the Show option in the Package Action menu
Note: if the Enable QR Code option has been selected then the QR code for the package can be displayed and distributed to potent package users.
The URL can also be harvested when the Show option appears in the menu displayed when the action icon of the package is selected on the Package Manager screen. Action icon is on the left hand side. 

When Show is selected a new browser windowed is open and the publish package is launched. Again the URL can be harvested.
9. Package Settings - 9.1 General

Package Settings
In Package Settings, the author can provide a description that becomes part of the metadata when the package is published.
Authors can also add tags (keywords) for easier searchability on the Package Manager page.
The language used for system instructions can be selected from a dropdown menu.
The Published Package URL box displays the URL of the learning package. If the checkbox is ticked, learner responses are stored on the Causeway server, and the author can download them as an Excel spreadsheet.
If the Enable QR Code check box is set then when the package is published then a QR icon  in the top right corner of the package banner. When the learner clicks on this icon the QR code for the package will appear on the screen.

The learner can scan this code to capture the package url, there are two other two options
 download the QR image.
 copy the QR image
Once this Settings have been set, they should be saved
Generating QR code for you package
 Enable Audio Commentary Auto-play: When this option is checked, any recorded voice-overs on your elements will play automatically when a learner enters the page. This is especially helpful if you have imported a PowerPoint slide pack and added an audio track..
Show Author Email Address when Published: Tick this box if you want to display your name and email address on the header banner of your published package.
 Do you wish to collect student responses ?
When a Package has been published and the URL distributed to Learners if this check box is ticked then Learner responses are stored on the Causeway server and the Author can download these responses as an excel spreadsheet to their local PC.
Hide package completion page ?
Completion Page – Now automatically added to the end of every package, providing students with:
- A summary of their usage
- Their score and time taken
- Prominent submission buttons (if required by the author)
- Easy access to any PDFs that need to be printed
Click the box to suppresses this page.
9. Package Settings - 9.2 Navigation Settings

Navigation Options:
0. Disable navigation panel and hide from learner
The remaining options can be set individually or in combination
1. Deactivate unvisited page links in learner navigation:-
This enables an author to set the navigation panel so that a learner cannot jump forward in the lesson.
2. Hide navigation section by default:-
Flag set by the author allows the learner to toggle the navigation panel of and on.
3. Collapse chapter navigation:-
In a large learning package there may be multiple pages within a chapter, by setting this flag the author causes the navigation panel to collapse to chapter headings. When the learner accesses the package, the chapters will expand to show the pages contained within.
9. Package Settings - 9.3 PDF Settings

The Author can set whether a Learner can print a PDF after they have completed the published / exported Learning Package Click on the appropriate icon to select the option you require.
The options are:-
Certificate – Confirming completion of the Package This can include the Learners name if the User Details element is included. And their score if the have answered any MCQs included in the package
Package Content – This included all content including images contained within the Package
Student Answers – This contains all the answers provided by the Learner to both MCQs and open questions
One, none or any of these options can be toggled on or off by the Author.
Once this Options have been set these should be saved
PDF Generation – a Document on how to set the flags to enable the learner to printout PDFs
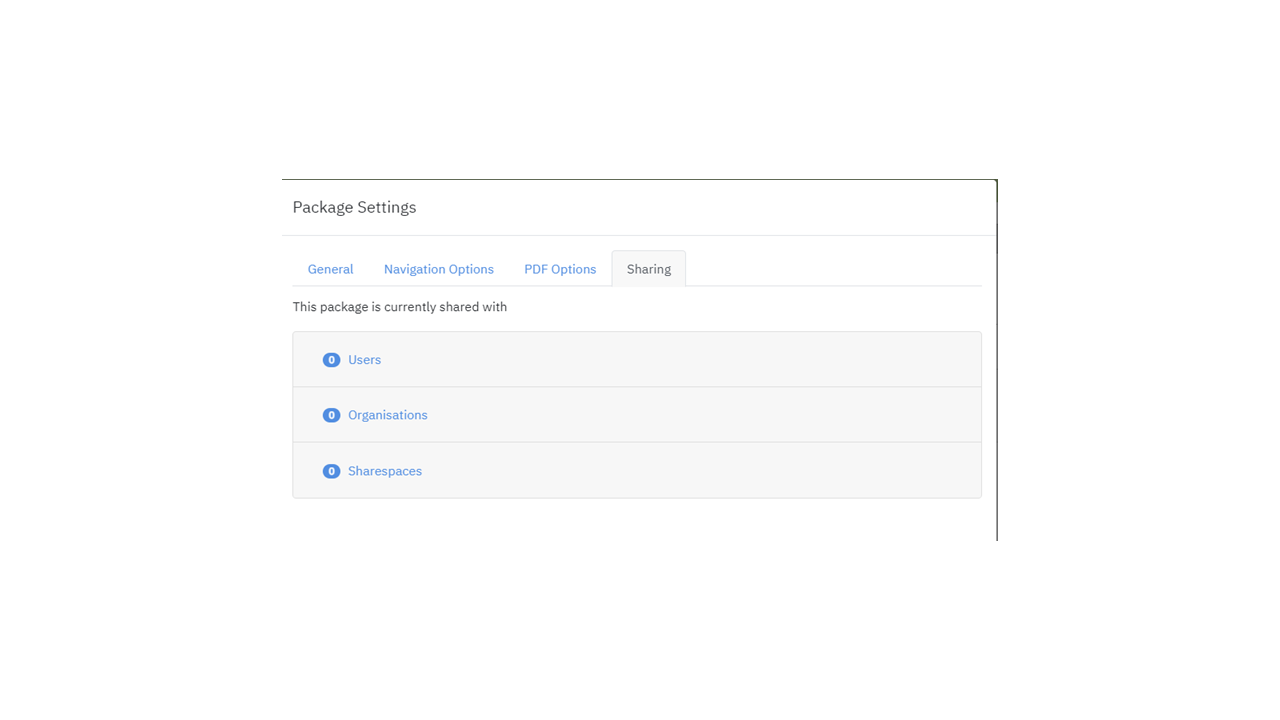
9. Package Settings - 9.4 Sharing
Within the general settings shared tab  , the author can use this facility to share the package.
Users:- This option enables the author to share Causeway packages with individual colleagues.
Organisations:- With groups of colleagues within their Institution.
Sharespaces:- With public share spaces accessible by Causeway users.
The numbers inside the circles indicate the number of times the package has been shared with other Causeway authors.
Once the package is shared with another they will have a preview/copy which they can edit/ modify.
Note: this sharing allows them to edit their copy the author will still retain the original source. If all you want is for an individual or group to see the package then simply send them the URL of the published package.
This option is also available via the Sharing icon on the Edit Package page.

Users:- This option enables the author to share Causeway packages with individual colleagues.
Organisations:- With groups of colleagues within their Institution.
Sharespaces:- With public share spaces accessible by Causeway users.
The numbers inside the circles indicate the number of times the package has been shared with other Causeway authors.
Packages shared with an Author can be accessed by clicking on
[My Packages] Tab on the Package Manager Screen and

selecting which shared packages they want to access.
Packages Shared with the Author can be previewed or copied to their own folder
10. Importing, Exporting and Sharing Packages - 10.1 Exporting
Packages can be exported from the Causeway environment and these exported learning packages can be hosted in other services such as an Learning Management system, such as Moodle or Canvas, or on a Web Server. The SCORM compliant exported content can also be imported into Causeway by other Causeway users

10. Importing, Exporting and Sharing Packages - 10.2 Importing
If a package has been exported from Causeway in SCORM format then this can be Imported with the
[Import a Package] button in the top left section of the Package Manager page.
When the Author clicks on this button the following appears

Click on the [Choose file] button to navigate to the zip file containing the package you want to import.
Press [Import] to bring the file into Causeway.
Note: This mechanism can also be used to import a PowerPoint slide deck into Causeway to create a new Causeway package. This mechanism only works for the very latest versions of Powerpoint i.e. with an extension .pptx If you wish to import an older PowerPoint slide deck then load the slide deck into PowerPoint and save it as a .pptx file
Import PowerPoint slide deck
10. Importing, Exporting and Sharing Packages - 10.3 Importing RLO
Import an eLearning Component
You can now import previously developed content into a package you are editing. This component is know as a
Reusable Learning Object (RLO)
To do this, place your cursor where you want to insert the content and click the import button .
A list of existing packages in your account will appear, and you can also choose from content shared with you.
You can insert an entire package using the import package button or expand it using the plus' button to select specific chapters or pages. Click on the import button on the right to import the selected content. To preview content before selecting click on the item name and a preview of the selected content is displayed.
Once imported, the content can be edited and rearranged like any other part of the package.
Finally, save your package.
This feature allows you to easily reuse and modify existing content.
10. Importing, Exporting and Sharing Packages - 10.4 Sharing
at the top of the edit Panel
Users:- This option enables the author to share Causeway packages with individual colleagues.
Organisations:- With groups of colleagues within their Institution.
Sharespaces:- With public share spaces accessible by Causeway users.
The numbers inside the circles indicate the number of times the package has been shared with other Causeway authors.
Packages shared with an Author can be accessed by clicking on
[My Packages] Tab on the Package Manager Screen and
selecting which shared packages they want to access.
Packages Shared with the Author can be previewed or copied to their own folder
11. Techniques - 11.1 Internal Links
Create an Internal Link or Branch
In a text block anywhere in the body of the package position & click your cursor.
Go to the Navigation Panel and click on the Page you want to branch to, click on the associated link symbol  .
.
A dynamic link is inserted into the text where your cursor is positioned.
The text associated with the link can be edited with the link icon  to make it more apparent to the learner. Highlight some or all of the link and click on the icon. The edit link window pops up and you can edit the wording and update the link. .
12. Analytics - 12.1 Capturing student responses
Instructions for capturing student responses
When you wish to capture the responses students make when they are interacting with a Causeway package there Are two options that an author can take.

Add User Details:
-
Open your package in edit mode.
-
Drag the User Details element to the top of the first page.
-
Save your changes.
-
-
Add Submission Instructions:
-
Edit the title of the first page to instruct students to click the Submit Responses button after completing each section.
-
-
Enable Response Collection:
-
Go to Package Settings.
-
Check the box labelled Do you wish to collect student responses?
-
Save your changes.
-
-
Publish the Package:
-
Go to the Status tab, set the status to Published, and save.
-
-
Distribute the URL:
-
In Package Settings, copy the URL of the published package.
-
Share the URL via email, web page, or Moodle.
-
-
Download Student Responses:
-
As students complete the package, a number will appear beside the Show icon indicating completions.
-
To download responses, go to Package Settings and click Download Learner Data.
-
This downloads an Excel file containing each student's:
-
Completion date
-
Unique ID
-
Name, email, and student ID
-
Responses to open questions
-
MCQ answers, shown as binary strings (e.g., correct: 0110; student: 1100)
-
-
View or download the document below to see how this is done:
Package Completed
You have now completed the package Causeway 2.7 User Guide.
Note: It is also possible to add an image to your package using the insert image functionality within a Text element. This functionality is designed for small images. See Images in a text element